OpenBOM™ is a registered Trademark of Newman Cloud, Inc. | © 2022
Sample – Order BOM with Sub-assembly BOM structure
In my article today, I will take you through the 5 simple steps you need to follow to perform the order in a very typical situation – ordering components and building assembly that has a sub-assembly inside.
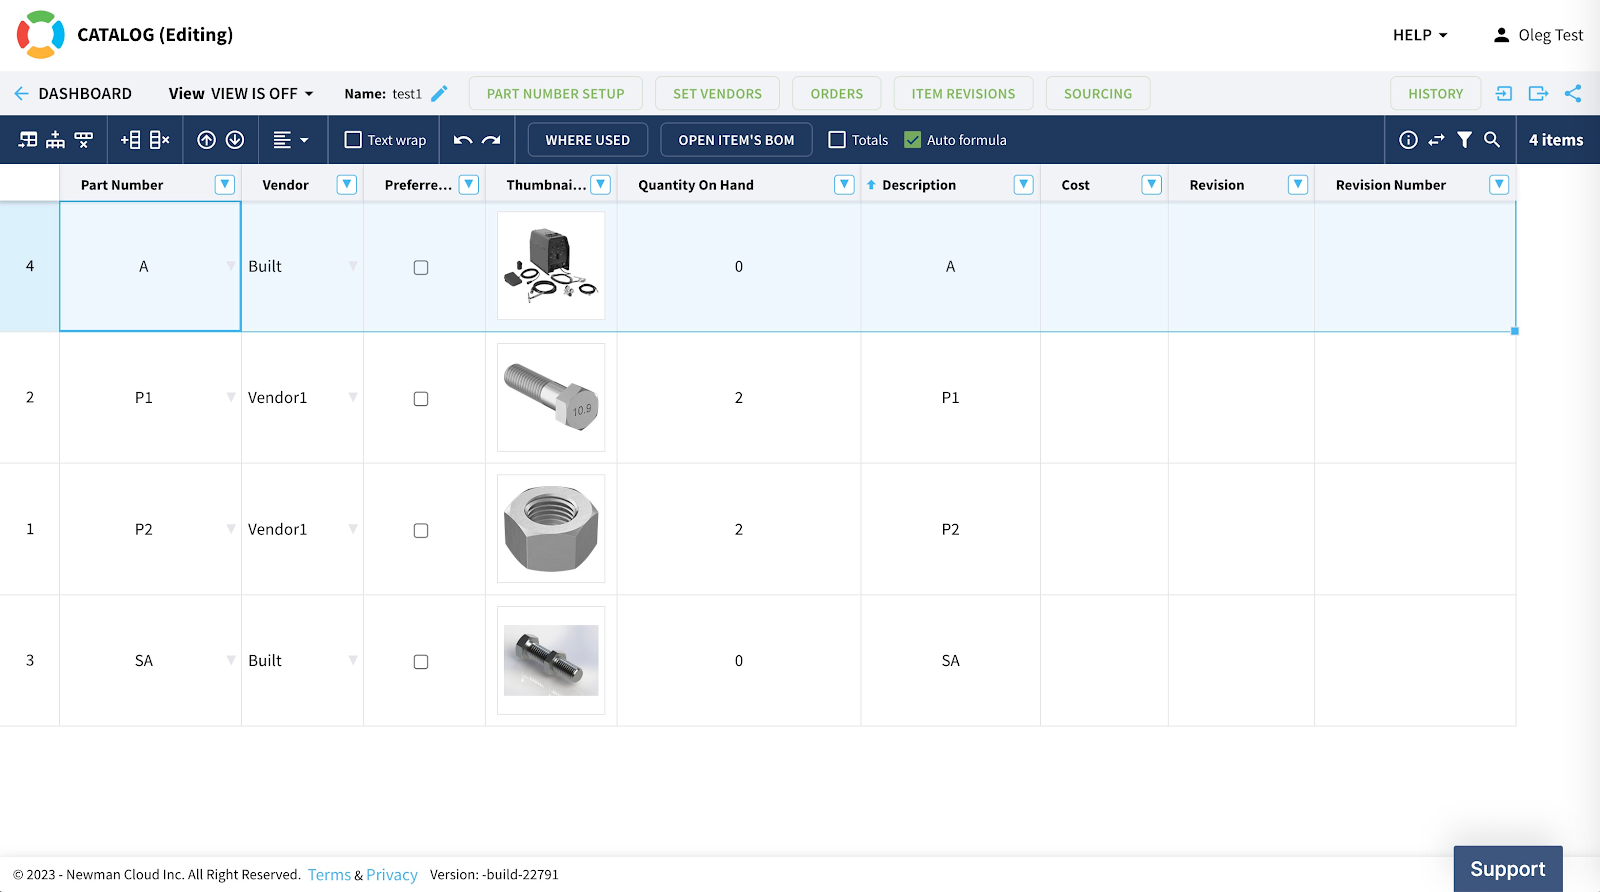
1- BOM and Catalog
Here is our BOM hierarchy. We need to build a product.
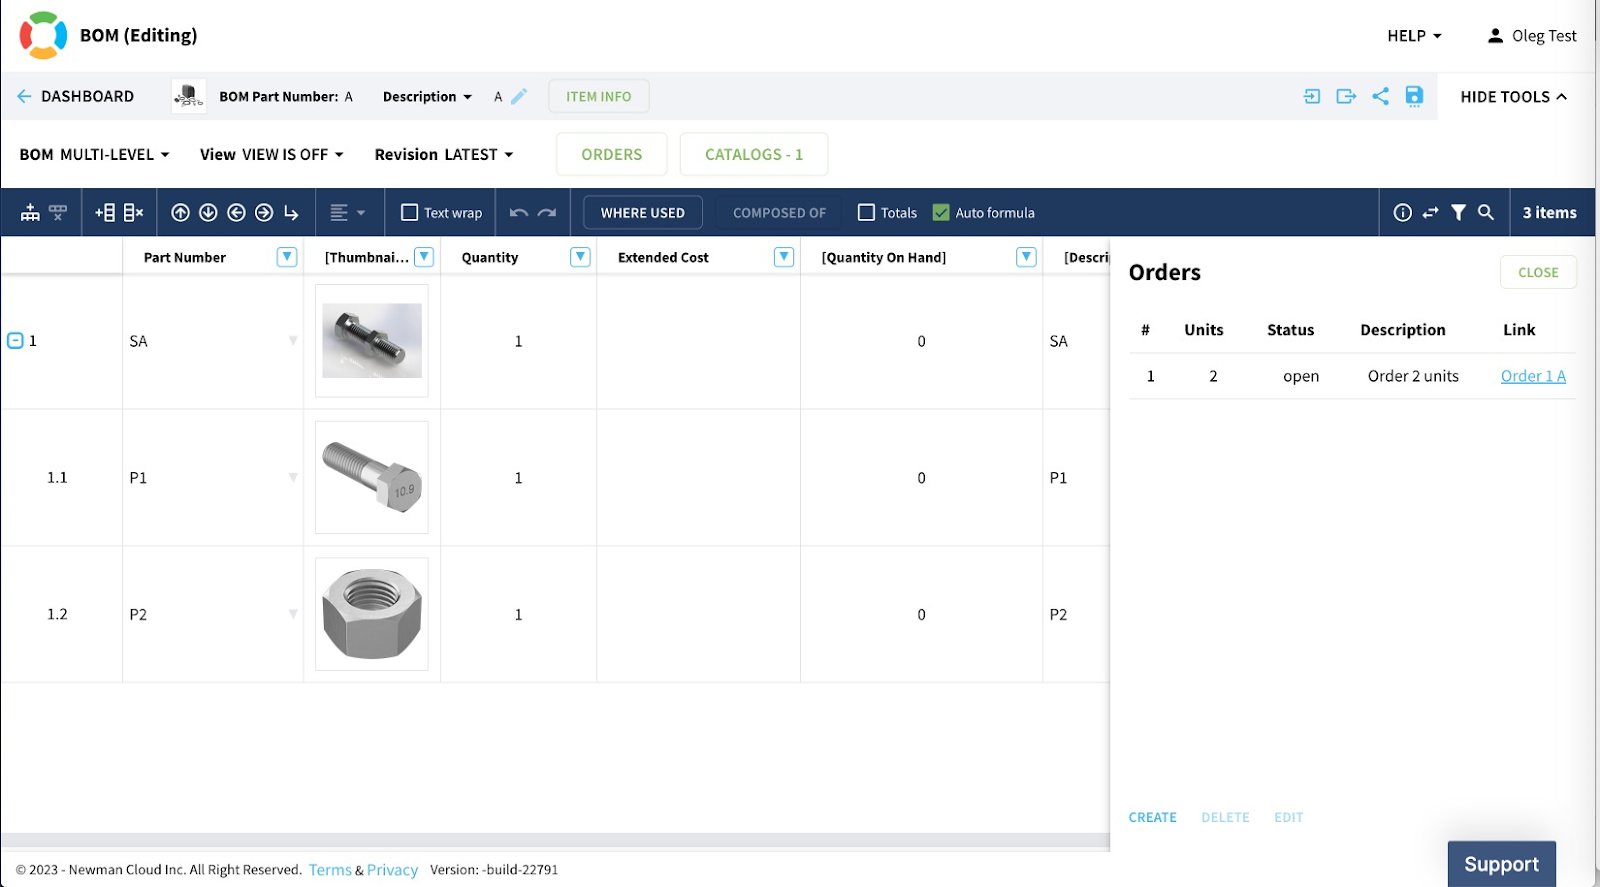
Defining vendors for each component is important. I put “Vendor1” for nut and bolt and I use “Built” vendor to indicate that the assembly will be created “in-house”.

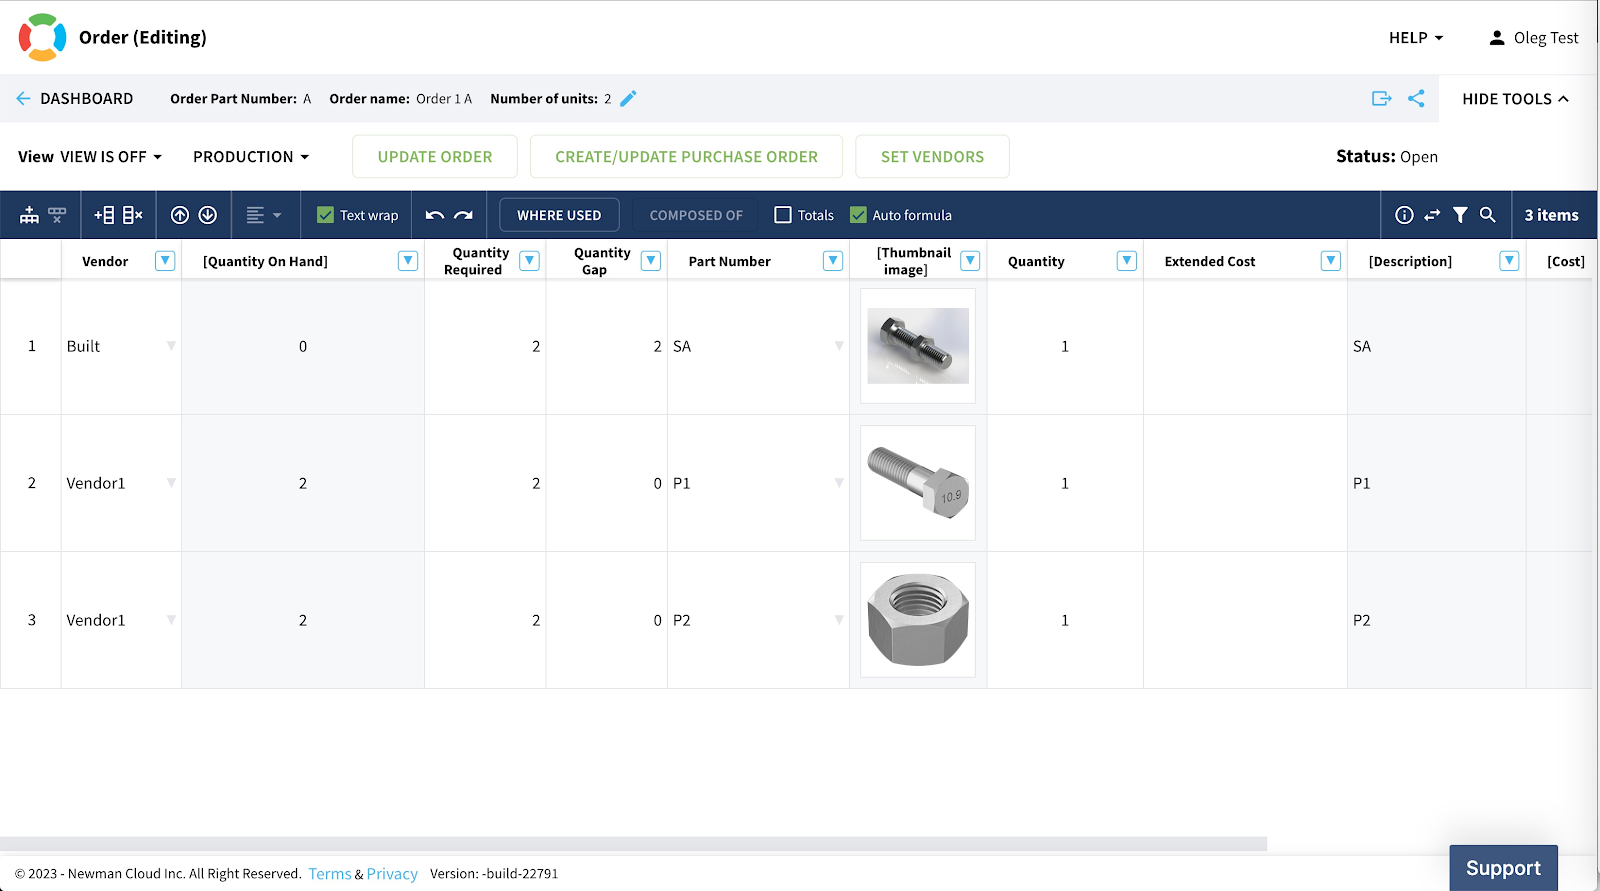
2– Create an Order and PO
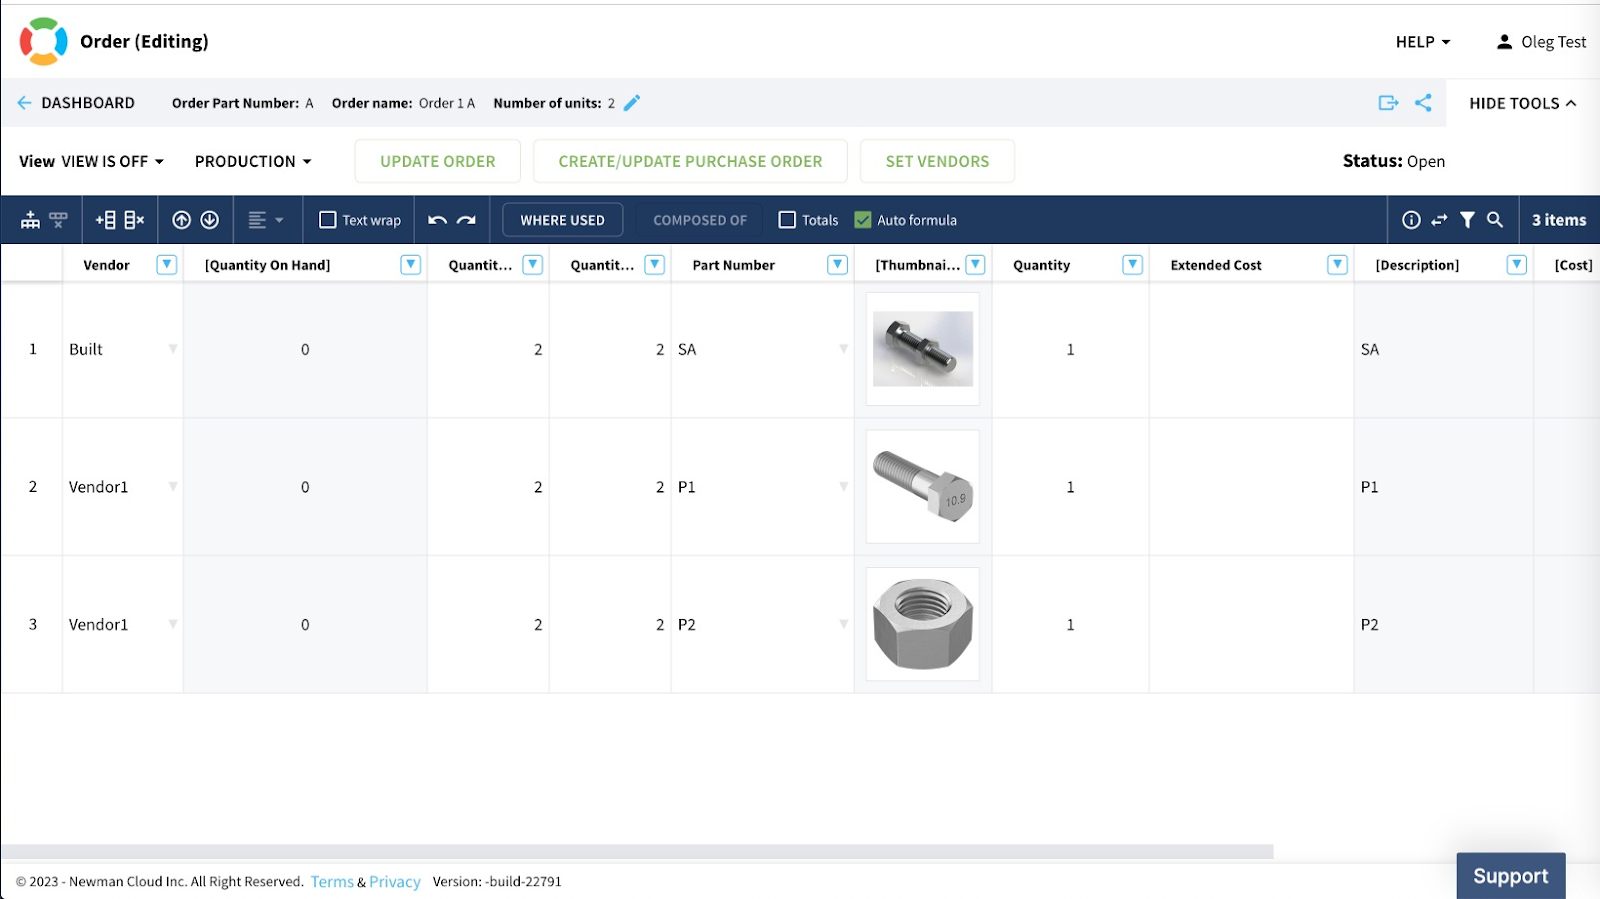
Now I’m ready to create an order (aka planning BOM), which will include a sub-assembly (SA). The sub-assembly is needed (based on the EBOM), but we don’t need to order it.
Here is our order BOM. You can see that 2x P1 and 2x P2 are needed. We also need 2x SA, but they will be assembled in-house.
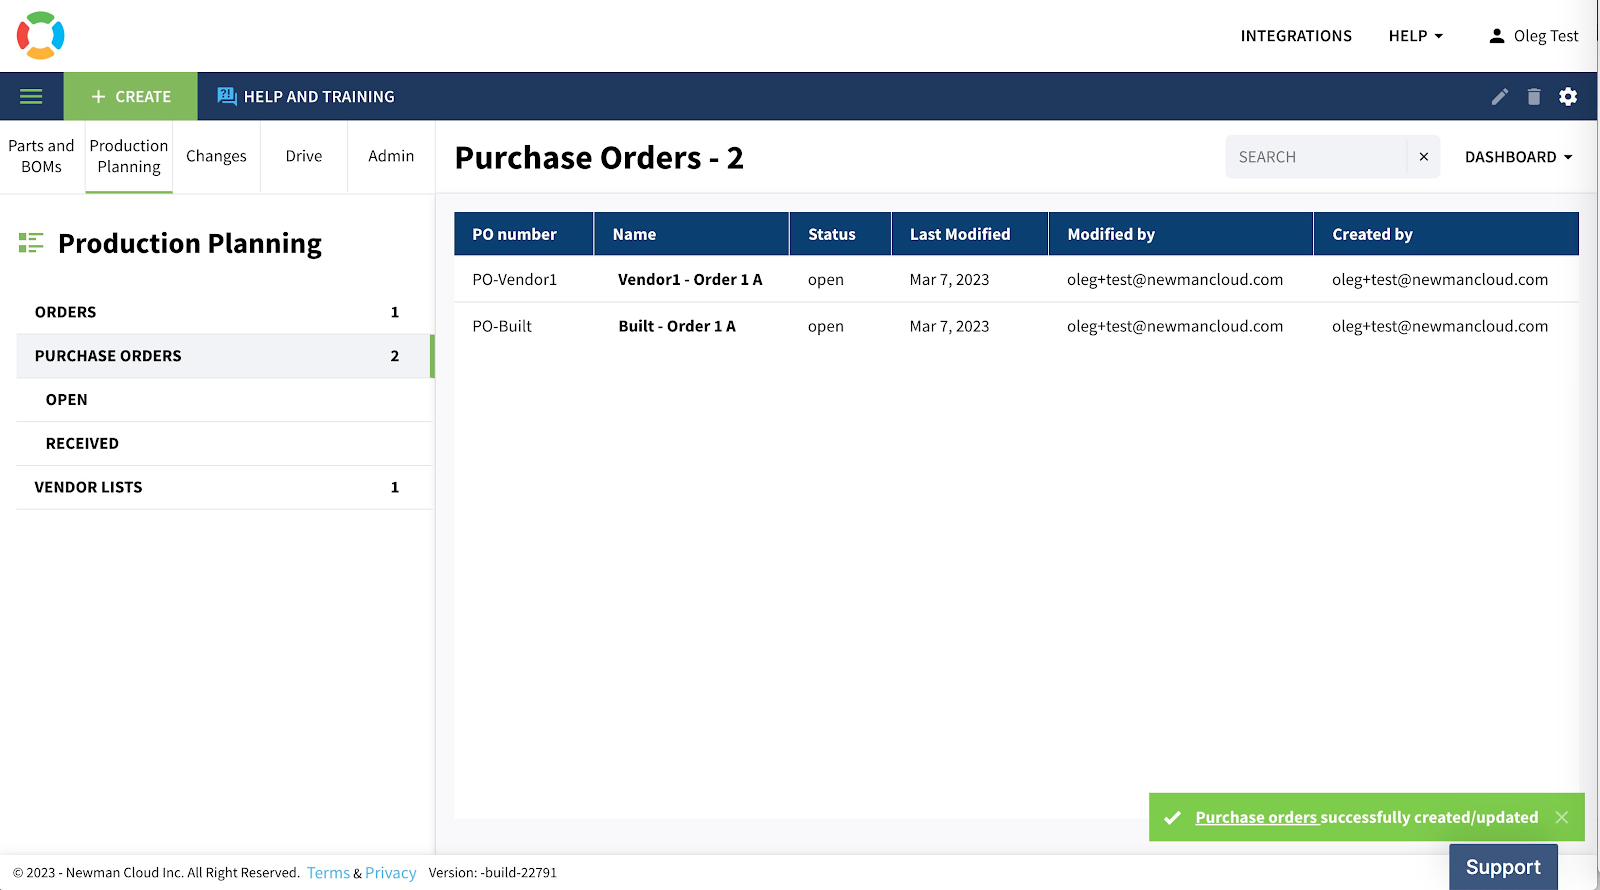
There are 2 POs created, but we will be using only one PO to order P1 and P2.
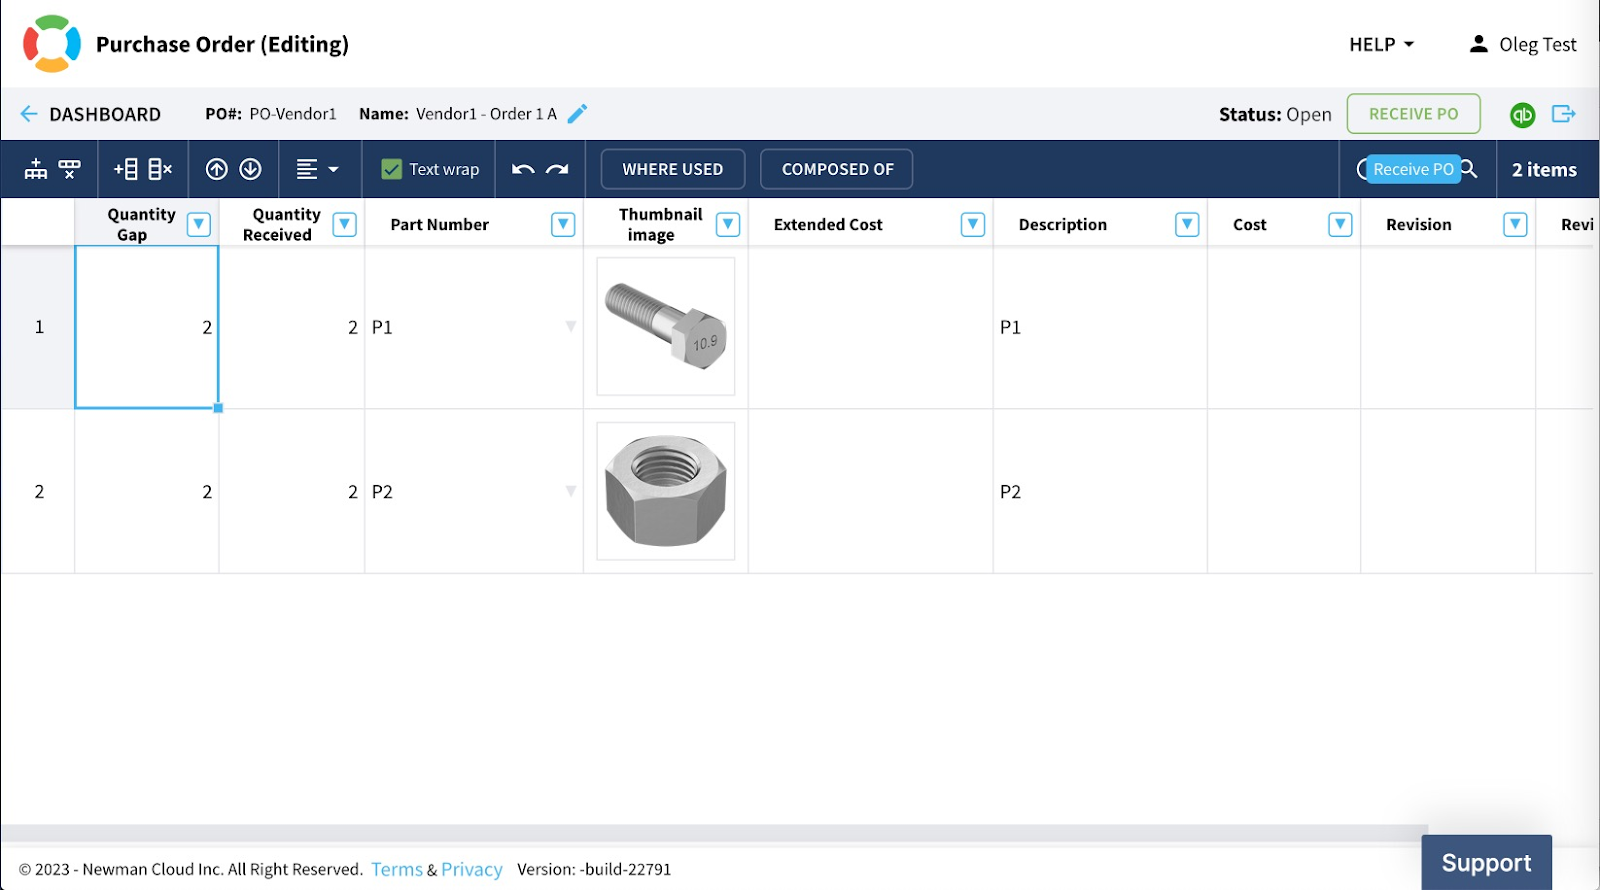
Here is the PO for P1 and P2
3- Recieve PO and Update Inventory
Once components are received, you can click on Recieve PO and the QOH (Quantity on Hand) will be updated.
You can see above that we have 2 components for both P1 and P2 and we are ready to start the build.
4- Update Order
Navigate to the order and click Update Order to ensure you don’t have any gaps. In a simple example like ours, it is clear, but in a complex order, you want to validate that gaps are zero for all components you need to purchase.
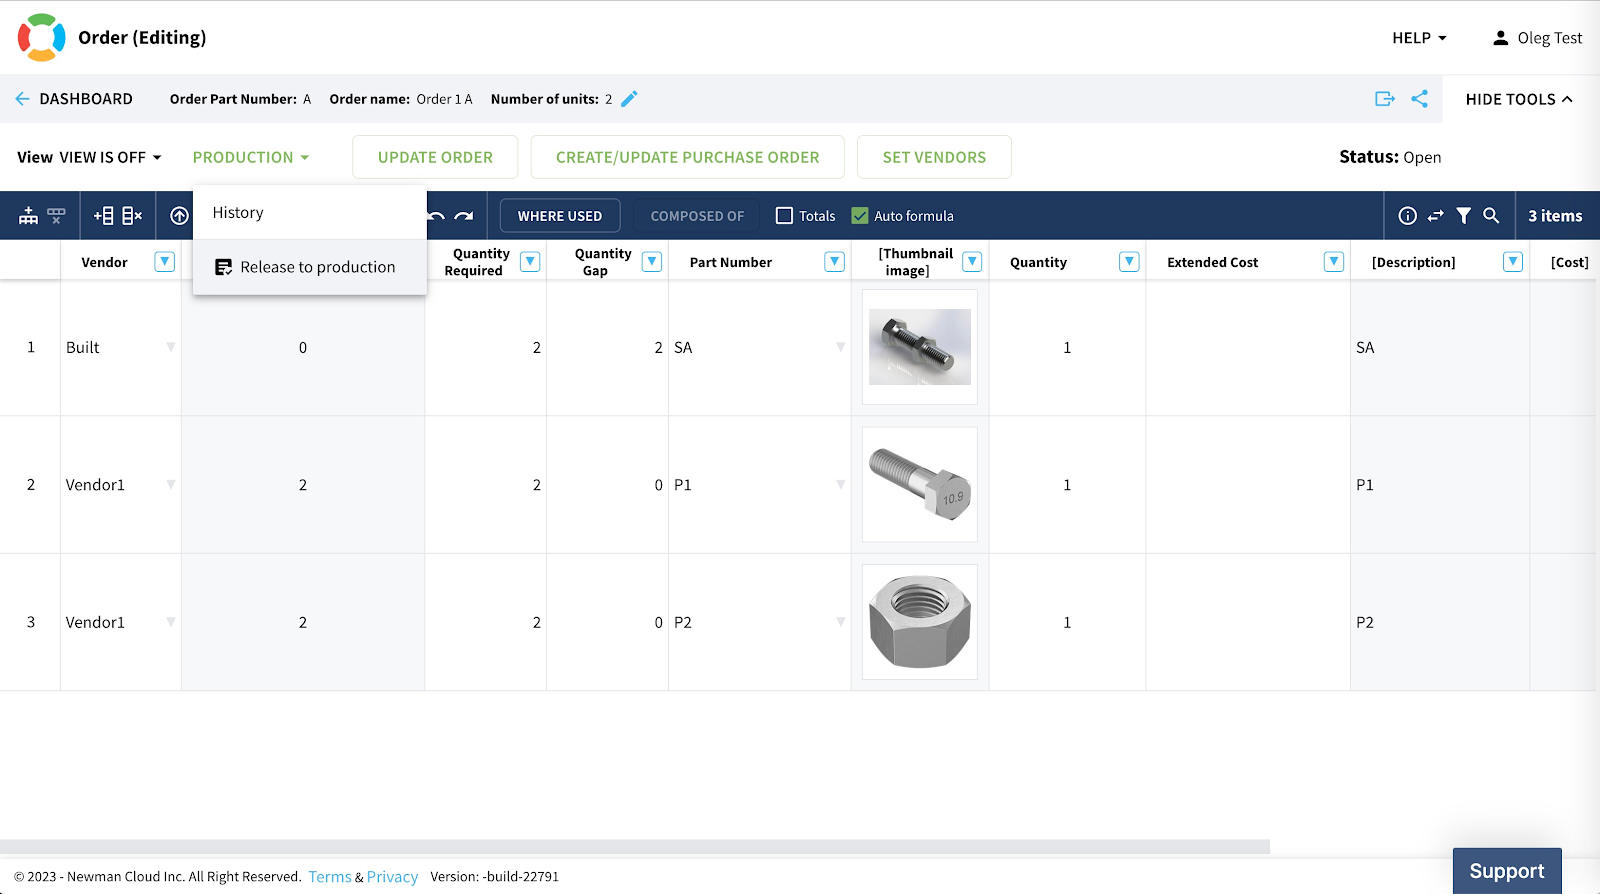
5- Release Order to Production (aka Build)
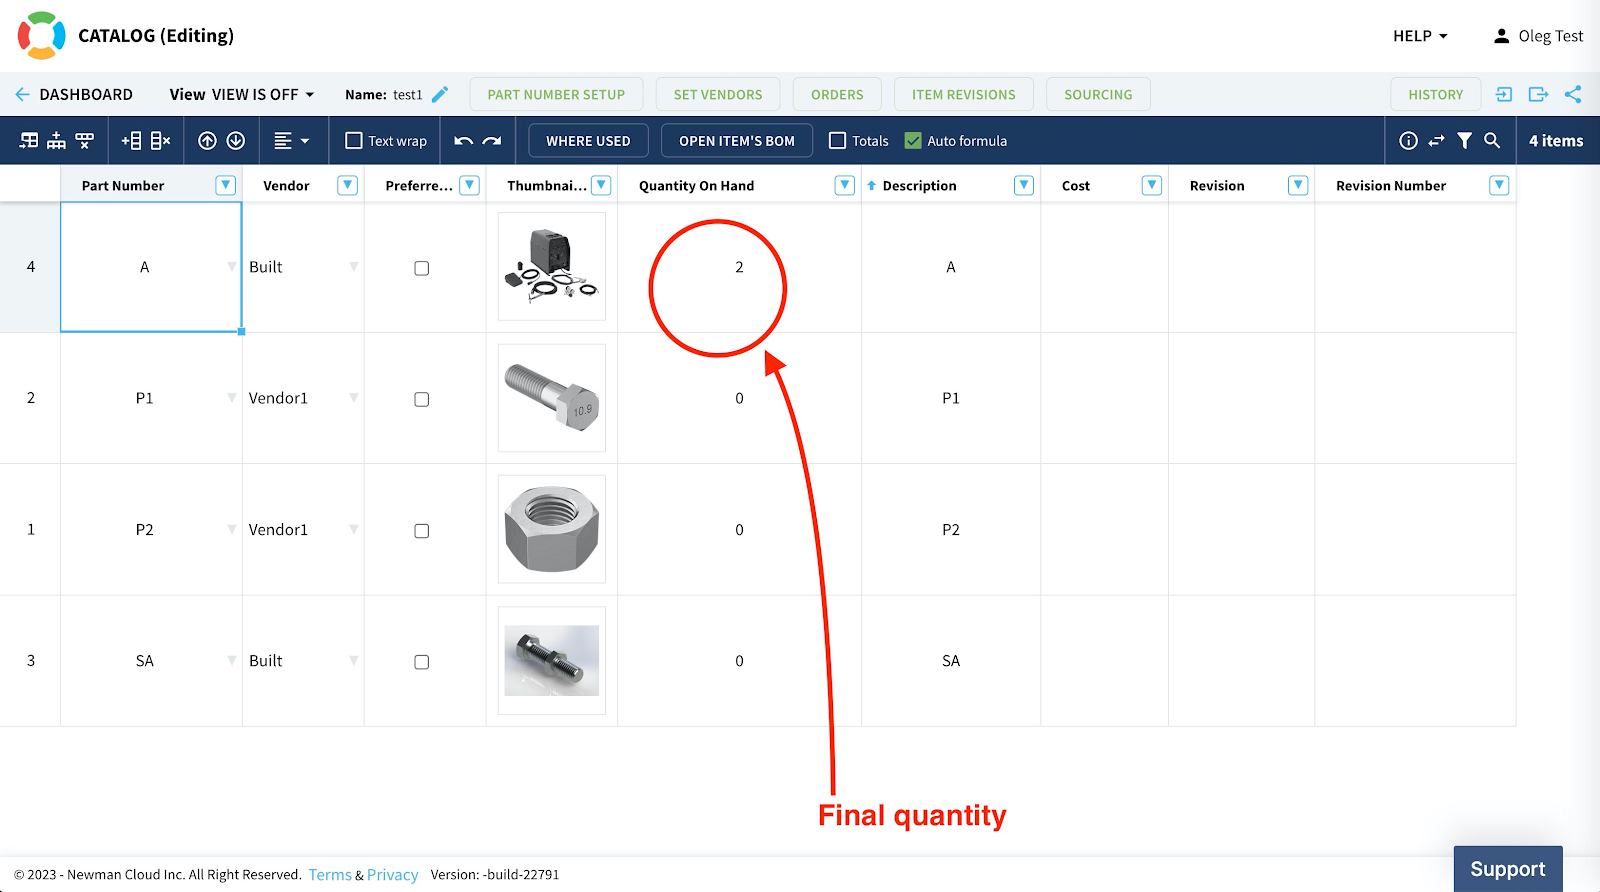
The final state is to release the order to production. When we do so, the components are consumed and the final product is built.
As you can see by the end all components QOH are zeroed and the final product is created.
Conclusion
We live in the era of manufacturing democratization. Manufacturing technologies and tools are becoming more affordable and available via different business models such as Manufacturing on Demand and Contract manufacturers where you can order products to be built online and ship them to the customers. However, planning is essential. New product development is a critical element in manufacturing and to be able to move fast and accurately is extremely important. To rely on spreadsheets to manage inventory and perform orders is a bad idea and leads to costly mistakes and delays. OpenBOM gives you an easy and simple way to manage EBOM in the Ordering process. Check this out.
What do you do when you have a bearing in CAD as an assembly but you buy it as a part? Like this bearing
Use the OpenBOM purchased Assembly workflow. Here are the details for Solidworks:
OpenBOM helps you to solve this problem by supporting a simple design to the purchasing process. Check more our documentation for production planning.
These are the basic steps:
1- Create and manage catalog(s) of items everything – assemblies, parts, etc.
2- Create and manage vendor list – these are companies you’re making orders from.
3- Create and manage Bill of Materials
4- Create an Order BOM and generate Purchase Order.
Today, I want to focus on one very painful moment of this process. It is related to the management of Purchased Assemblies in Solidworks and creating of Bill of Materials for these assemblies.
In a nutshell, here is a typical problem. You need to have a purchased assembly (eg. Electrical Motor) with all parts in your Solidworks design, but to include only top-level assembly in the BOM.
I have a piece of very good news for you. Since the last update of OpenBOM add-in for Solidworks, we have the full support of child components display options. Here are how these settings will be used:
This is the image to remind you how these options can be set in Solidworks.
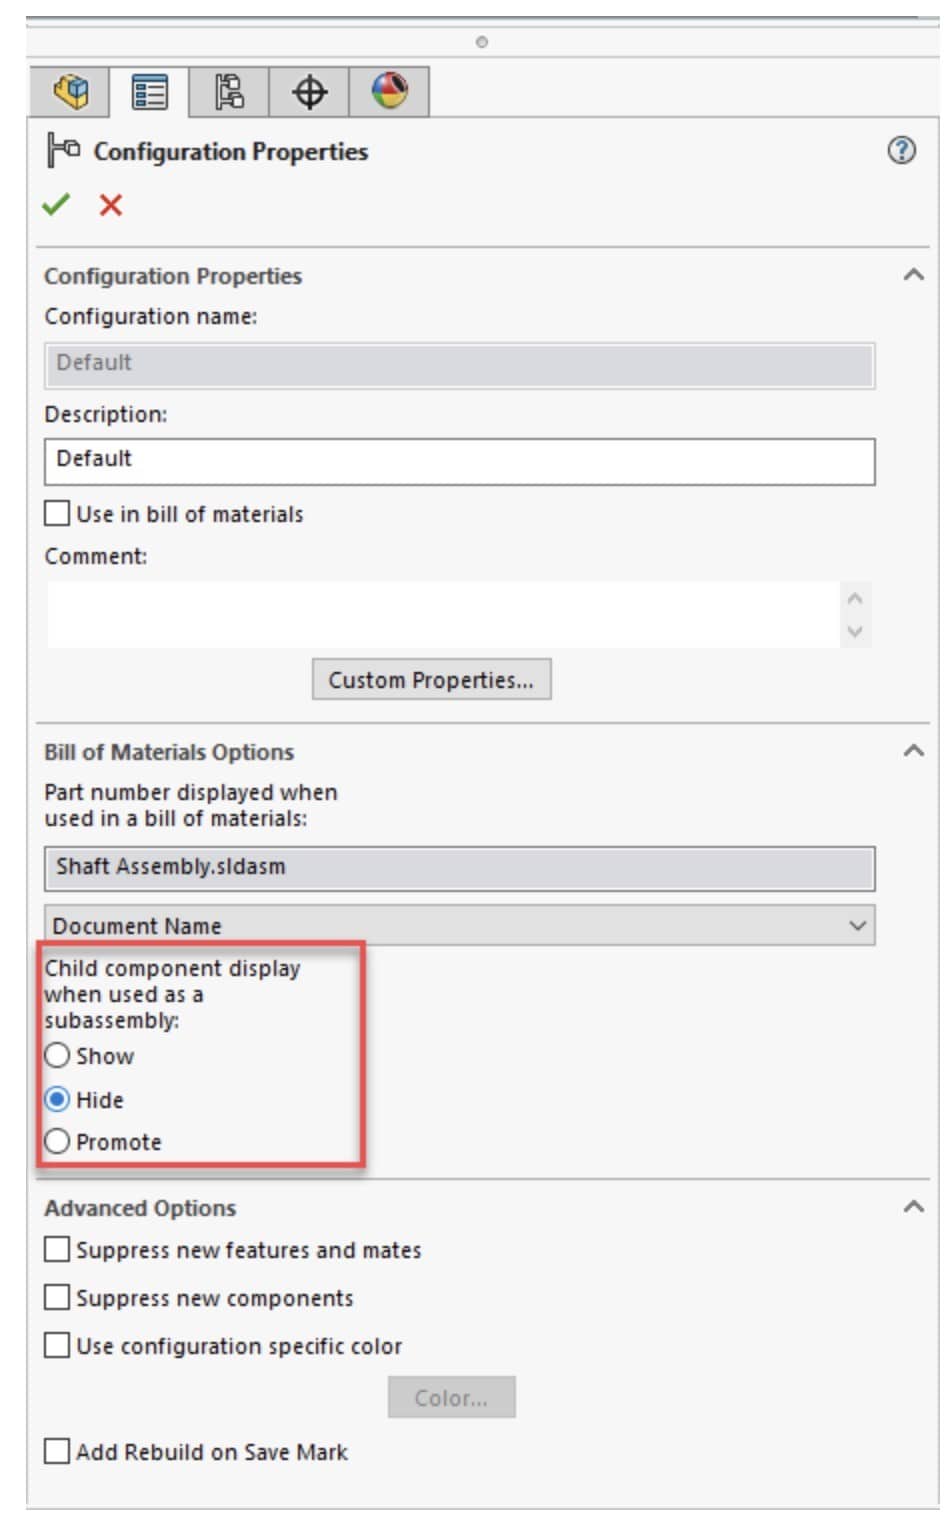
- Show (Solidworks default) – show/include all sub-items in the BOM
- Hide (purchased assembly workflow) – do not include sub-items in the BOM
- Promote (the phantom assembly workflow) – do not include the assembly and move all sub-items to the upper level
In the following video, you can see a short demonstration of how the child component display option can be used to create a BOM with purchased assemblies from Solidworks directly in OpenBOM. Please check this out.
When managing Bills of Materials (BOM) in OpenBOM, data creation is often a repetitive and time-consuming task. One such task is the addition of new items to a catalog. However, OpenBOM offers a handy feature that lets you do this seamlessly without having to leave the BOM screen. In this article, we’ll walk you through this streamlined process.
How to Simplify Data Creation with OpenBOM:
OpenBOM Catalog Management: Begin by using the OpenBOM catalog to manage your items. Although it’s not obligatory, configuring your Part Number settings can make the process more efficient.

(1) Adding a New Item: Once in your BOM, add a new item. You’ll notice an empty line where the new item will reside.
(2) Item Info Panel: Next, open the Item Info panel to view and modify details for the new item.
(3) Part Number Command: Within the panel, select the option to edit the new item’s Part Number and generate its unique Part number
(4) Fill Out the Properties: Once you’ve generated the Part Number, fill out the necessary properties for the new item
(5) Save: Finally, hit the ‘Save’ button. And voilà! Your item will now be added to both the catalog and the BOM with just a few clicks.
Watch the video to see how it works:
https://www.youtube.com/watch?v=-FBd7jhr0Gc
What is the best Item creation method
There are multiple ways to create an item in OpenBOM – add it to a catalog, import it from Excel, save it from CAD, or add it from a BOM as I demonstrated above. Each method is good for a specific scenario. This one is good when you need to create an item seamlessly during the BOM creation process.
Fewer Clicks: The streamlined process means fewer clicks, resulting in faster data entry and reduced chances of errors.
Seamless Workflow: By organizing tasks in a way that they can be executed from a single screen, OpenBOM allows for a more seamless workflow.
Examples:
SOLIDWORKS
For each Part on the Assembly open its File Properties, add the File Property for LENGTH and Set the Quantity from “-None-” to the File Property ex: Length:

Fusion
For each Component right click and check “Use Length as Quantity”

Videos on Raw Materials and using different units of measure:
Video 1: Using the SW Option QTY as Length – SOLIDWORKS.
Ordering Raw Materials Using OpenBOM – Part 2 (youtube.com)Video 2 – Export Length as Quantity using Fusion
OpenBOM for Autodesk Fusion – Export Length as Quantity (youtube.com)
You need to edit “Dashboard” view in user defined view. The first 4 properties are displayed in the graph.

https://help.openbom.com/get-started/where-used-graph-navigation/
Graph navigation in OpenBOM offers a new way to navigate between interconnected data objects, providing a novel approach to element navigation within the system. [Note, graph navigation is 4 top properties from “Dashboard” view]

This also changes the Items View

There have been times when our support staff find issues with customers’ browsers that require the local storage to be cleared. Most often, when other apps are involved. In any case, if you are directed to clear your local storage, here is how you do it: (the image below is Chrome, details for other browsers are listed at the end o fhis post)

Here’s how you can clear local storage in your browser:
For Google Chrome / Microsoft Edge / Brave:
- Open the site whose storage you want to clear.
- Right-click anywhere on the page and select Inspect (or press
Ctrl+Shift+I/Cmd+Option+Ion Mac). - Go to the Application tab.
- On the left, under Storage, click on Local Storage and select the site.
- Right-click any key and choose Clear (or click one key, press
Ctrl+Ato select all, then right-click and choose Delete).Alternatively, you can also:
- Click Clear site data from the Application tab (this clears local storage, session storage, cookies, etc.).
For Firefox:
- Open the site.
- Press
F12orCtrl+Shift+I(Cmd+Option+Ion Mac) to open DevTools. - Go to the Storage tab.
- Expand Local Storage and select the site.
- Right-click and choose Delete All.
For Safari:
- Enable the Develop menu (Safari > Settings > Advanced > Show Develop menu).
- Open the site.
- Press
Option+Cmd+Ito open Web Inspector. - Go to the Storage tab (or Resources in older versions).
- Find Local Storage and clear the entries.
- For all CAD integrations, check you have available OpenBOM Storage you can check in your profile or in the Settings of the OpenBOM addin. if you are running out contact support@openbom.com


2. Drawing name or FileName.
For SOLIDWORKS, the Drawings File need to be on the same Folder as the Model, Part or Assembly and have the same filename without file extension. Ex: 1000984.SLDPRT and 1000984.SLDDRW and be on the same folder:

Note: If you are using SOLIDWORKS PDM, make sure all files are cached in your local view, get latest versions
For Autodesk Fusion
Document name with the same name or with “ Drawing” appended, this is the default naming convention in Fusion

This OpenBOM Addin Install requires a zip file.
It can be downloaded for your Os here:
OpenBOM™ Integration For KiCAD – OpenBOM
When you Open the Plugin manager in kiCAD and install from file, it expects a zip file
Safari in MacOS can auto unzip downloads and can compromise this install. Here is how to disable it:
To stop Safari from automatically unzipping downloads, follow these steps:
Open Safari and go to Preferences (or Settings in newer versions).
In the General tab, uncheck the option that says Open ‘safe’ files after downloading.
This will prevent Safari from automatically extracting ZIP files and keep the original files intact in your Downloads folder.


Proceed with the Instructions found in readme.txt
OpenBOM(tm) KiCad integration by Newman Cloud, Inc. Copyright © 2025
1. Register for an OpenBOM account if you don’t have one yet: https://bom.openbom.com
2. Inside the archive, you’ll find the kicad_openbom.app bundle — a standalone version of the integration app. You can place it anywhere on your disk.
3. After launching, if you see the message “kicad_openbom.app not opened”, go to System Settings → Privacy & Security, scroll down, and click Open Anyway.
5. You can automatically map the KiCad CLI using the standalone integration app.
6. To do this, open KiCad and go to KiCad → Settings.
7. Then switch to the Plugins tab and ensure that the KiCad API is enabled.
8. Alternatively, the integration app can be installed directly via the KiCad Content and Package Manager.
9. Open KiCad 9 or later, and locate the Content and Package Manager button.
10. Click “Install from File…” and select the downloaded archive to begin the installation.
11. Restart KiCad for the changes to take effect. Once reopened, you’ll notice the OpenBOM ribb