OpenBOM™ is a registered Trademark of Newman Cloud, Inc. | © 2022
- Home
- Training Courses
- OpenBOM Basics Course
- Registration & Settings
- Dashboard Walkthrough & Searches
- Creating BOMs from Excel
- Creating BOMs from CAD
- Creating BOMs Manually
- Preparing Catalogs
- Multi-Level & Flattened BOMs
- Exporting Reports
- Creating User-Defined Views & Filtering Information
- Real-Time Collaboration
- Revision & Change Management
- Managing Your Team
- OpenBOM Data Management Course
- OpenBOM Change Management Course
- End-to-End Design to Purchase Process
- Introduction
- 1. Install OpenBOM Add-In
- 2. Sign into OpenBOM
- 3. Edit Your Settings
- 4. Create a BOM Using the One-Click BOM
- 5. Create a Vendor List
- 6. Open Your CAD Items Catalog
- 7. Add Business Data to Your Items (Vendors and Costs)
- 8. Order Long-Lead Items
- 9. Mark a Purchase Order as “Received” in OpenBOM
- 10. Create an Order BOM
- 11. Create a Purchase Order
- 12. Export a Purchase Order
- OpenBOM CAD Integration Courses
- OpenBOM Design Course
- Premium Onboarding Experience
- OpenBOM Basics Course
- Getting Started
- Video Demos
- OpenBOM Basics
- Training Courses
- Part Number Management
- Import Data
- Design Projects
- New Product Development Process
- CAD Integrations
- Bill of Materials
- OpenBOM Community
- “Where Used” and Graph Navigation
- Flattened BOM Feature
- Generate PDFs (and More) from CAD
- Generate Part Numbers for CAD
- Create RFQs and POs
- Manage Revisions of Attached Files
- Export Data as a Zip
- OpenBOM YouTube Channel
- Administration
- Data Management
- Properties
- File Management
- Search & Filters
- BOM Types
- Creating BOMs
- BOM Compare Service
- Formulas, Calculations, & Rollups
- Organizing Data
- Custom Objects
- Using Templates
- Exporting Data
- User-Defined Views
- Team Views
- Collaborate & Share
- Production Planning & Inventory Control
- Change Management and Revision Control
- User Defined Commands
- xBOM Types
- Integrations
- Home
- Training Courses
- OpenBOM Basics Course
- Registration & Settings
- Dashboard Walkthrough & Searches
- Creating BOMs from Excel
- Creating BOMs from CAD
- Creating BOMs Manually
- Preparing Catalogs
- Multi-Level & Flattened BOMs
- Exporting Reports
- Creating User-Defined Views & Filtering Information
- Real-Time Collaboration
- Revision & Change Management
- Managing Your Team
- OpenBOM Data Management Course
- OpenBOM Change Management Course
- End-to-End Design to Purchase Process
- Introduction
- 1. Install OpenBOM Add-In
- 2. Sign into OpenBOM
- 3. Edit Your Settings
- 4. Create a BOM Using the One-Click BOM
- 5. Create a Vendor List
- 6. Open Your CAD Items Catalog
- 7. Add Business Data to Your Items (Vendors and Costs)
- 8. Order Long-Lead Items
- 9. Mark a Purchase Order as "Received" in OpenBOM
- 10. Create an Order BOM
- 11. Create a Purchase Order
- 12. Export a Purchase Order
- OpenBOM CAD Integration Courses
- OpenBOM Design Course
- Premium Onboarding Experience
- OpenBOM Basics Course
- Getting Started
- Video Demos
- OpenBOM Basics
- Training Courses
- Part Number Management
- Import Data
- Design Projects
- New Product Development Process
- CAD Integrations
- Bill of Materials
- OpenBOM Community
- "Where Used" and Graph Navigation
- Flattened BOM Feature
- Generate PDFs (and More) from CAD
- Generate Part Numbers for CAD
- Create RFQs and POs
- Manage Revisions of Attached Files
- Export Data as a Zip
- OpenBOM YouTube Channel
- Administration
- Data Management
- Properties
- File Management
- Search & Filters
- BOM Types
- Creating BOMs
- BOM Compare Service
- Formulas, Calculations, & Rollups
- Organizing Data
- Custom Objects
- Using Templates
- Exporting Data
- User-Defined Views
- Team Views
- Collaborate & Share
- Production Planning & Inventory Control
- Change Management and Revision Control
- User Defined Commands
- xBOM Types
- Integrations
Creating BOMs and Catalogs
This set of resources provides you with practical information on how to create BOMS and catalogs in OpenBOM.
OpenBOM manages items and BOMs. Catalogs are used as containers for items in OpenBOM. You can create as many catalogs as you need. BOM is a representation of a specific product. The basic bill of materials in OpenBOM is a list of items with a specific part number belonging to the item representing a top-level BOM.
So what is a BOM? A BOM is a list of the raw materials, sub-assemblies, intermediate assemblies, sub-components, parts, and the quantities of each needed to manufacture an end product. Engineers like to call the list of components placed in the drawing a part list. CAD vendors put a lot of effort into renaming it to BOM and it largely worked, although you can still hear engineers calling it a “part list”.
And what is a catalog? Think of a catalog as a centralized database of all your items (standard, engineering, outsourced, etc.). A catalog defines a distributed database of all items and the bill of materials defines a specific product.
These are basic elements of the product information data model in OpenBOM. Read more about it here.
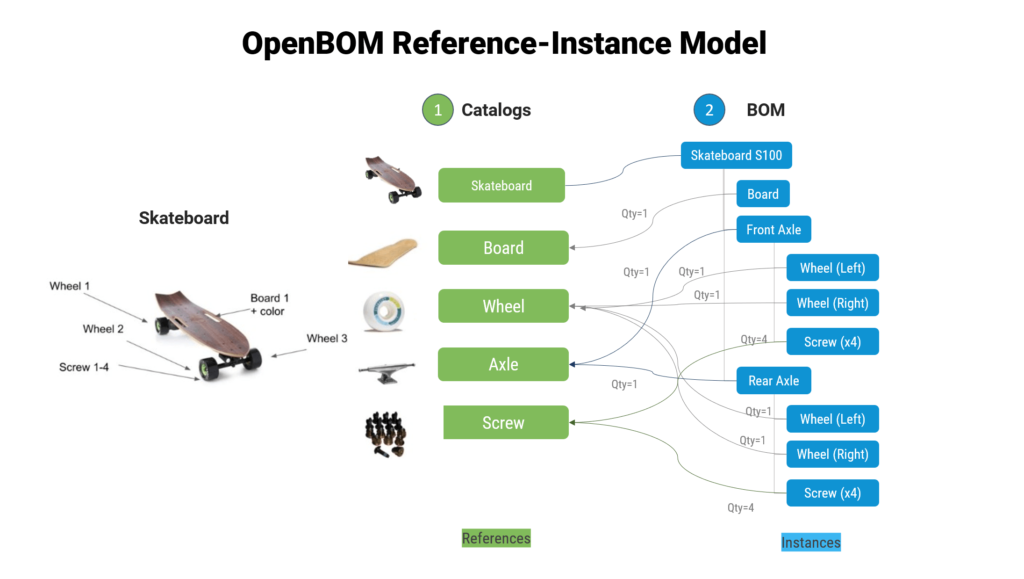
Items and Bill of Materials Creation Process
There are 3 ways to create BOMs in OpenBOM:
If you’re specially interested in creating of Multi-level BOMs, please check this article.
OpenBOM basic process of data creation includes the following steps:
- Create item classification (catalogs)
- Create items (by import from spreadsheets, CAD or manually)
- Create bills of materials (directly from catalogs or by importing from spreadsheets or CAD)
Creating a Catalog from Scratch
We recommend starting by creating catalogs. My usual recommendation is to create the first catalog and define a few parts there to build your first BOM. However, if you’re asking yourself how many catalogs should you create, we have an excellent article that will explain our catalog planning process here.
To create a catalog navigate to OpenBOM dashboard and use the Create Catalog menu.
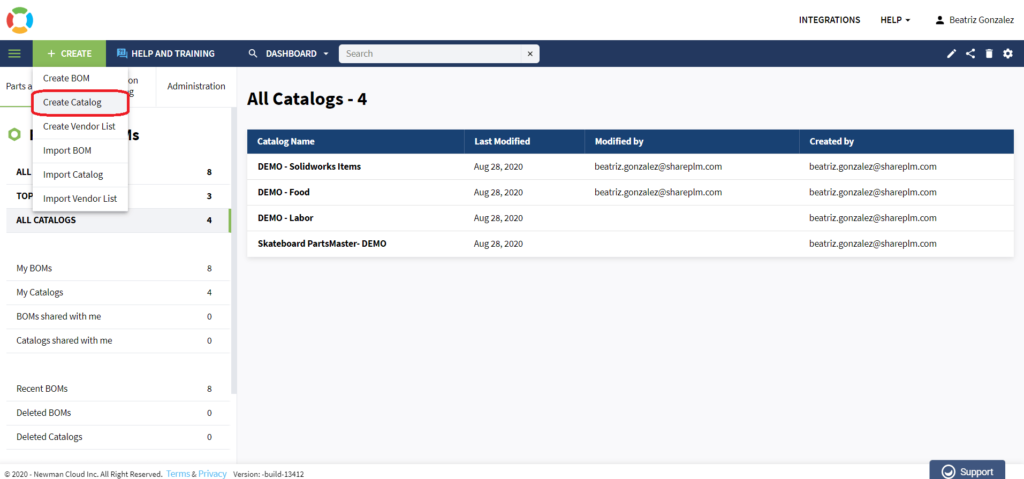
Creating a New Catalog
After you select the Create Catalog command, you will see a New Catalog dialog. You will need to enter a name. The email is selected automatically. If you need to have an automatic part number configuration, choose the Part Number Setup command.
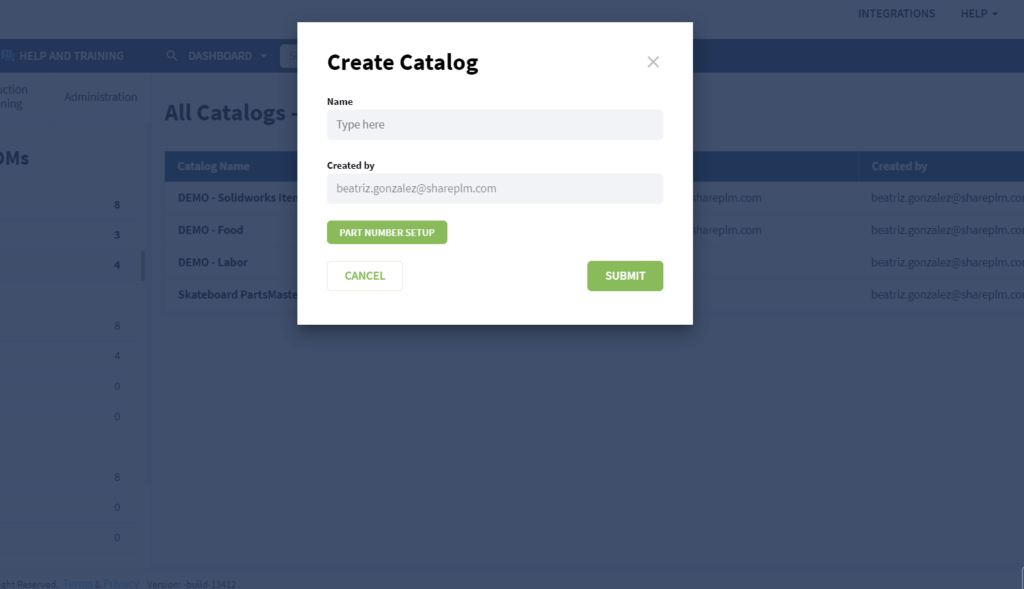
You can decide to create a different catalog to classify your items (e.g. mechanical parts, electronic parts, outsourced assemblies, purchased assemblies, build assemblies, SKUs). Having just one catalog is perfectly fine.
The catalog is created with a set of default properties. Some of them are very important and we don’t recommend to delete them (e.g. part number, quantity on hand). Without these properties, OpenBOM’s functionality would be limited. However, other properties are just useful and you can delete or replace them with other properties.
Once you create a catalog, you will have something similar to what is presented in the following pictures. If you manually create a catalog you can add images manually also by uploading image files to the OpenBOM properties. It is a good idea to add properties such as cost, link to spec document, and more.
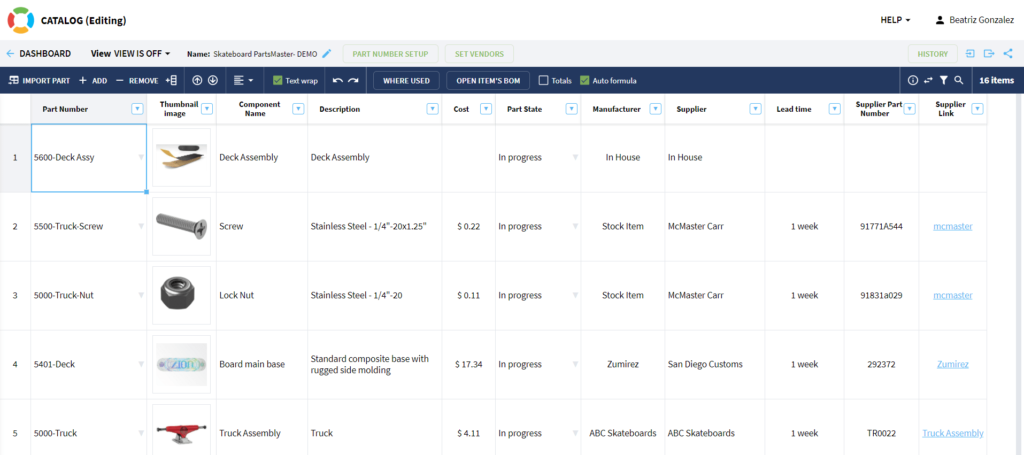
Once you’re done with the catalogs, you can move on and create new BOMs.
Creating a BOM from a Catalog
You can use a few alternative ways to create a BOM from a Catalog and navigate between them.
To start off, in the dashboard, click on “Create” > “Create BOM”:
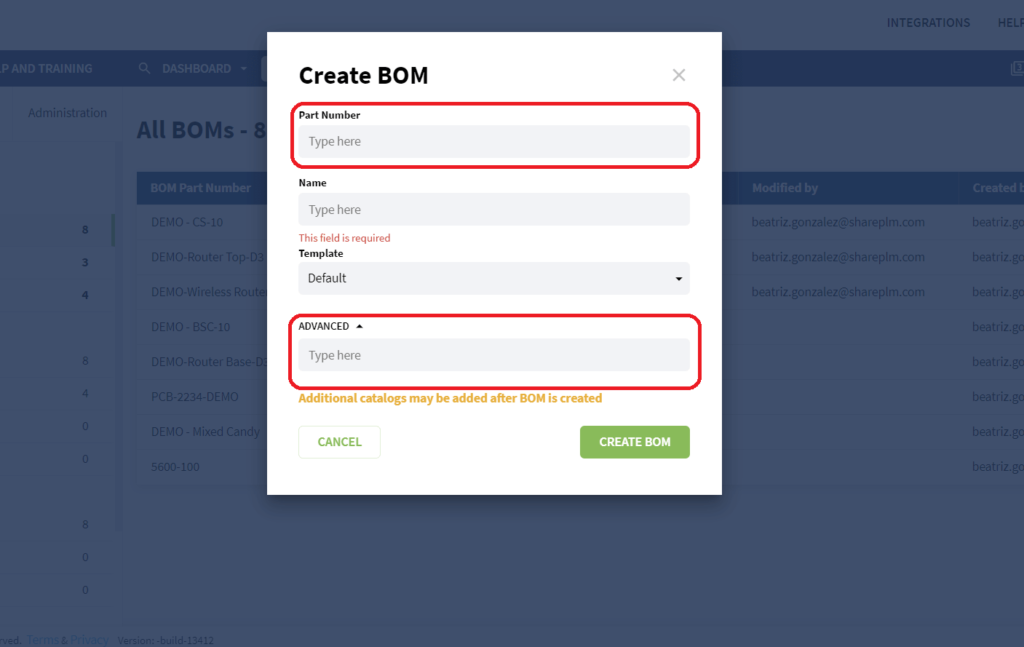
A pop-up window will appear and you’ll need to type in the top-level assembly item number. Click on “Advanced” to connect your new BOM to the catalog you just created. You can do that by selecting the catalog in the dropdown. When you are ready, click on “Create BOM”.
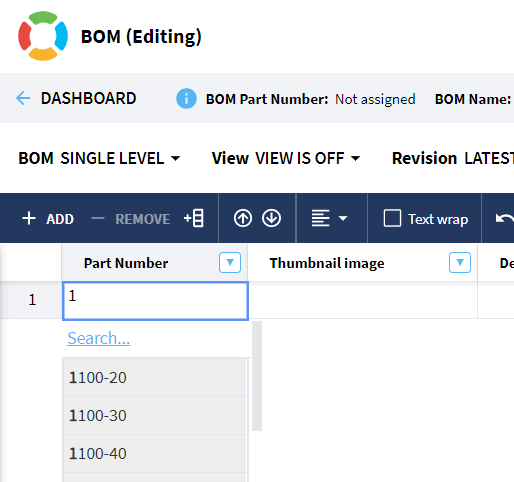
In your new BOM, start typing in the part number column, and click on search to select from a catalog:
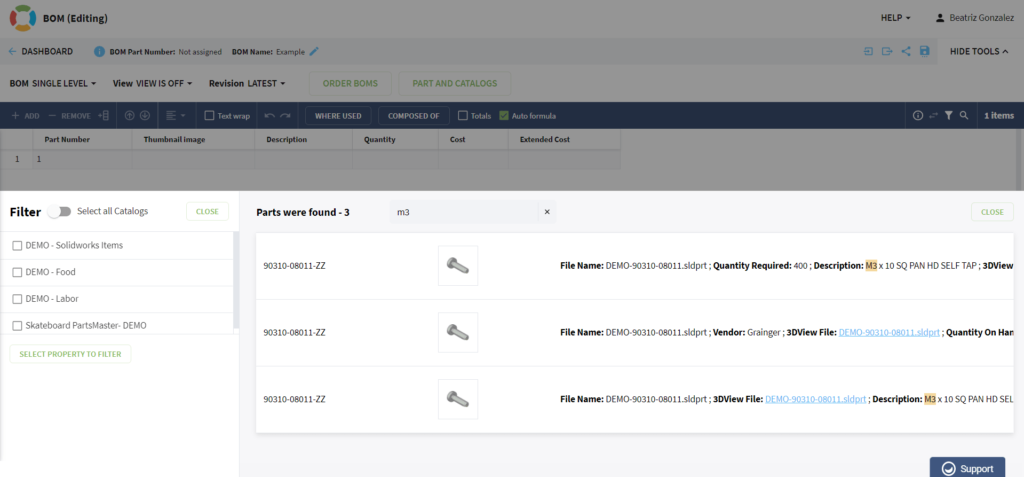
Find the item you want to add from your catalog, select it, and voila! Here is your BOM.
Now, think about this situation: you have a SKU (part number) for your end product or sub-assembly created. What if you would like to create or navigate to this BOM immediately from the catalog? Now you have this option. It will eliminate the need to have multiple operations such as – creating a BOM, assigning catalog to the BOM, or finding the BOM based on name/part number in the dashboard.
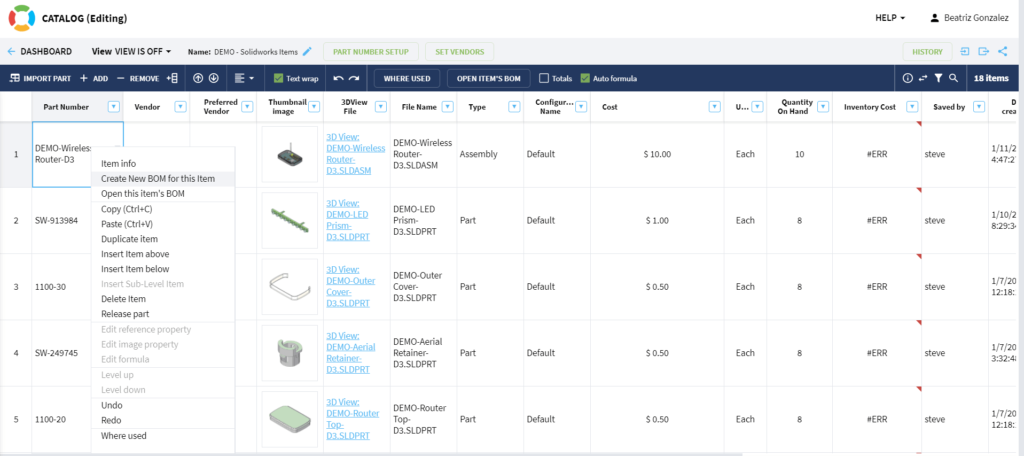
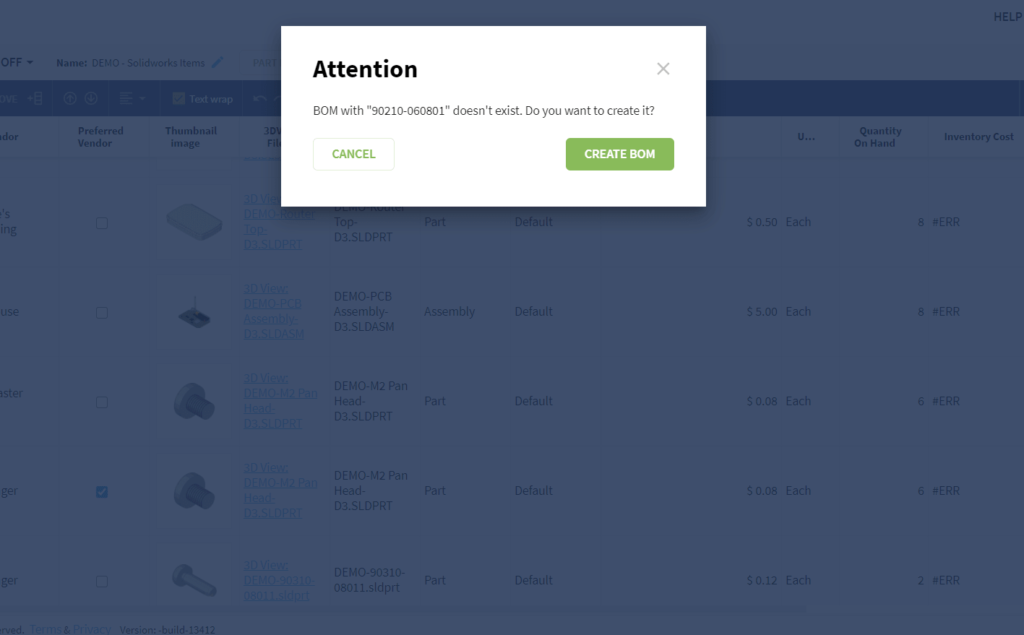
If you try to open an item’s BOM, but the BOM doesn’t exist, OpenBOM will offer you an option to create a new one. Just click on “Create BOM”. This method is particularly useful when you follow catalog item creation first.
Navigate to a Catalog from a BOM
Honestly, this is not a new function. But, it is very much connected to BOM-Catalog navigation behavior, so I decided to mention it here. I also observed many times how users missed that option (it is well-hidden in the info-panel).
The navigation options will also be available from toolbars.
Few additional topics that must be reviewed:
- The setup of part numbers in the catalog
- Creation of single-level and multi-level BOMs
Creating a New BOM from Scratch
OpenBOM has a new and improved dashboard. The design is cleaner with fewer buttons and improved color-coding. As you get to the new dashboard, you can clearly follow the “green” GO color.
Creating a new BOM only takes a single click on the button. And if you just registered an account with OpenBOM, you don’t need to do anything else – just click on Create > Create BOM to see the following dialog.
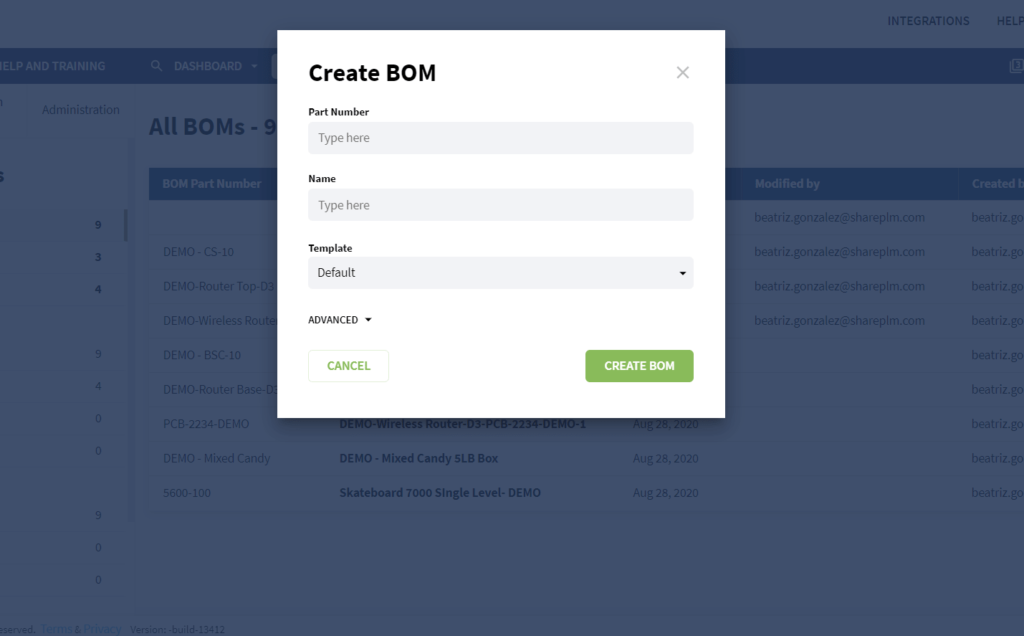
This dialog requires only one input field: a part number. Everything else will be taken care of by default – name will be equal to the part number, the template will be set to default, and you will be automatically assigned default catalog.
Creating a New Bill of Materials
Create a new BOM using the default command and default template, don’t touch the advanced settings (or select a catalog). The following bill of materials will be created.
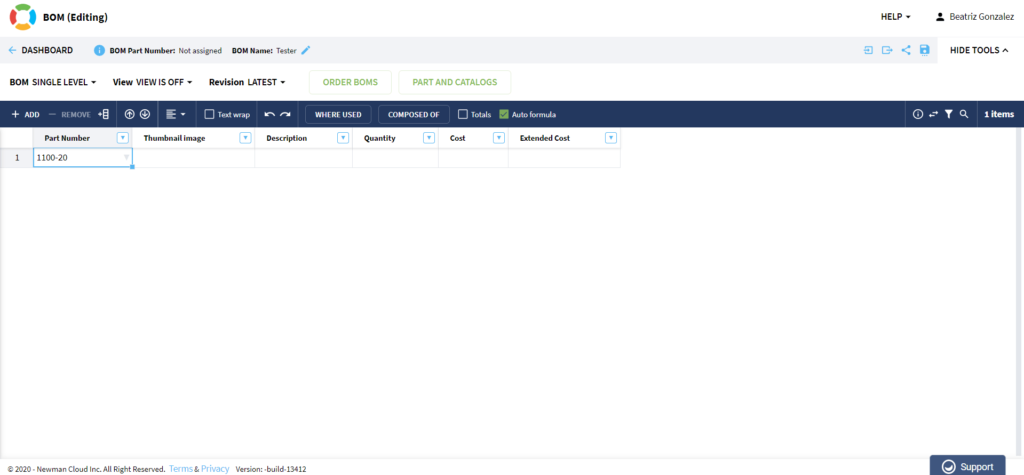
You can see the editable properties (these are the part instance properties – e.g. part number, quantity calculated cost, etc. They are catalog properties. You can see them greyed out (also names are in square brackets like this [Description]). These are part properties.
When you start typing a new part number, the new item panel will show up and you will be able to create an item (part or another assembly).
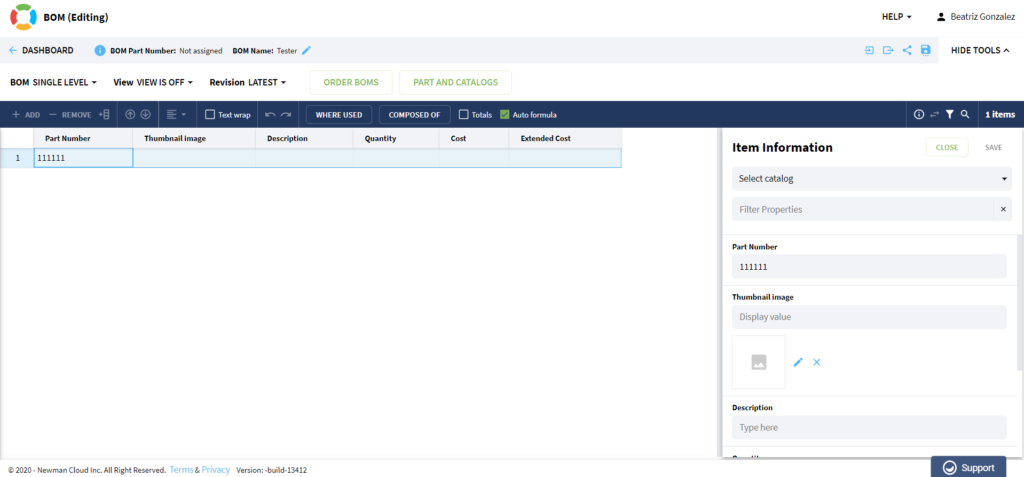
Here is a BOM that was created using this method. Notice the item information, which means the information about parts is managed as a single source of truth.
Save BOM Template
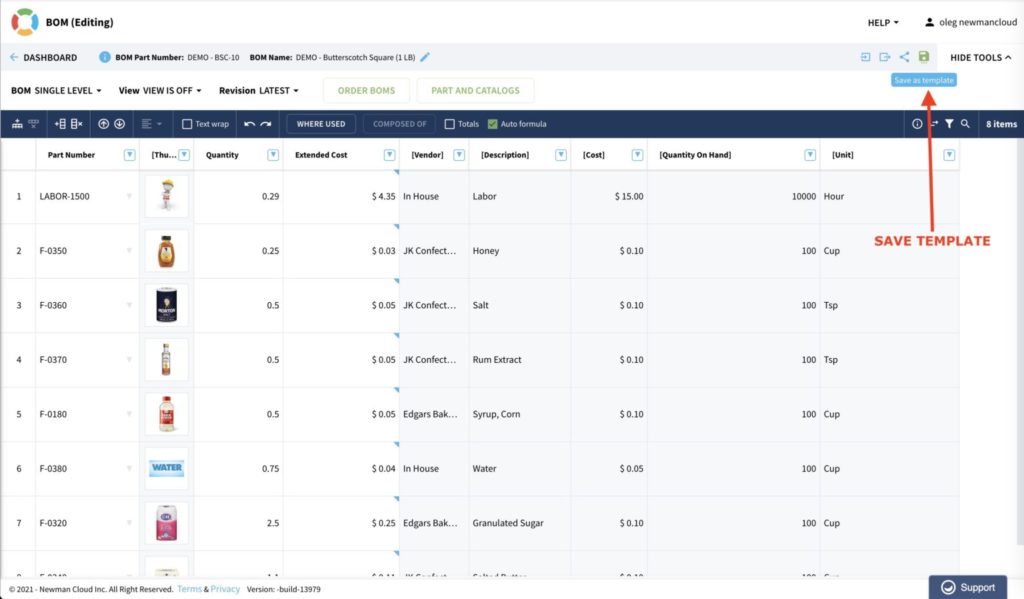
You can save a template from the existing BOM and use it in the future. The recommended best practice is to create a BOM, configure all properties, set catalogs, formulas, etc., then use Save Template command.
By saving the BOM template, you will preserve all settings you need to create a new BOM, which will be identical to the first BOM you created. The template will be used next time you create a new BOM. You can also use the template in Settings of CAD add-in, so the next time BOM from the CAD system will be created exactly how you want.
To modify the template, save a new template with the same name. Follow the full instructions and best practices here.
NOTE: The template is applied to BOM only when you created a BOM. It does regulate the catalog assignment and list of properties. It does NOT define the order of properties. You should use user defined view to control the order of properties.
Note: Templates saved by Team/Company admin are visible and can be used by all team members. Templates created by regular users are only visible to the same user.
Creating a New BOM/Catalog from Spreadsheets
From the OpenBOM Dashboard, click the “Create” button and select “Import BOM” (or “Import Catalog”) from the drop-down menu.
Select your spreadsheet file as shown below by selecting your source file form: Excel or Google Drive. Once the dialog is complete, click “Import” and your BOM or Catalog will be created. Finished!
Follow the full instructions and best practices here.
Creating a New BOM from CAD
OpenBOM’s CAD integrations are ready to “plug in” and have been built using the best-in-class technology. That means that when you connect your CAD tool to OpenBOM, you’ll get all the functionalities you need to extract your CAD data in a smart way. You’ll be able to set up your integrations remotely online (OpenBOM is a SaaS platform) and work with cloud infrastructure, regardless of whether you’re running the CAD system on your desktop or in the cloud.
Find all of our CAD integrations, instructional videos, and plugins here.
Multi-Level BOMs
OpenBOM gives you full flexibility in data management, there are many ways to create your BOMs and catalogs in a fast and efficient way with our interface.
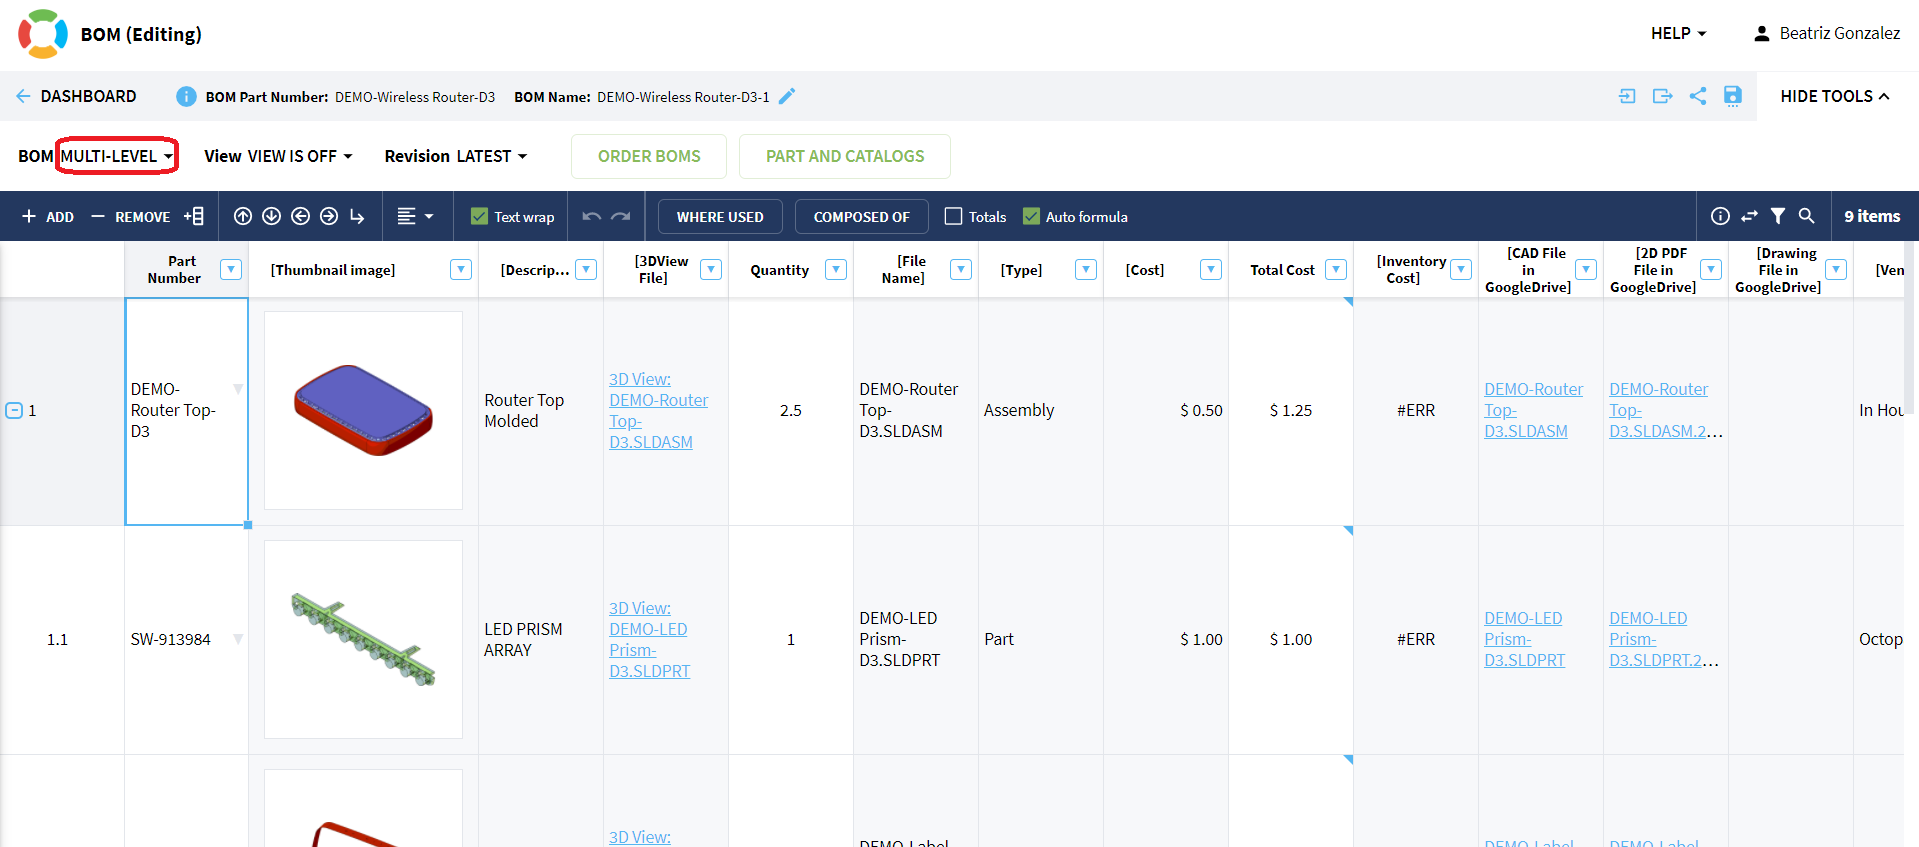
The OpenBOM model allows you to create and manage any types of bill of materials from very simple part lists to very complex multi-disciplinary structures with a diverse set of properties in each level. These BOM types give you a full range of flexibility when it comes to the definition of simple part lists and complex structures.
There are three fundamental BOM types: single-level BOM, multi-level BOM and flattened BOM (report). Learn all about these BOM types and how to use them here. To learn more about creation of Multi-level BOMs, please check this article.
Deleting and Recovering Properties
Sometimes it becomes necessary to delete an unwanted property within your BOM, for example, from an imported BOM. Here’s how a BOM or catalog property can be deleted.
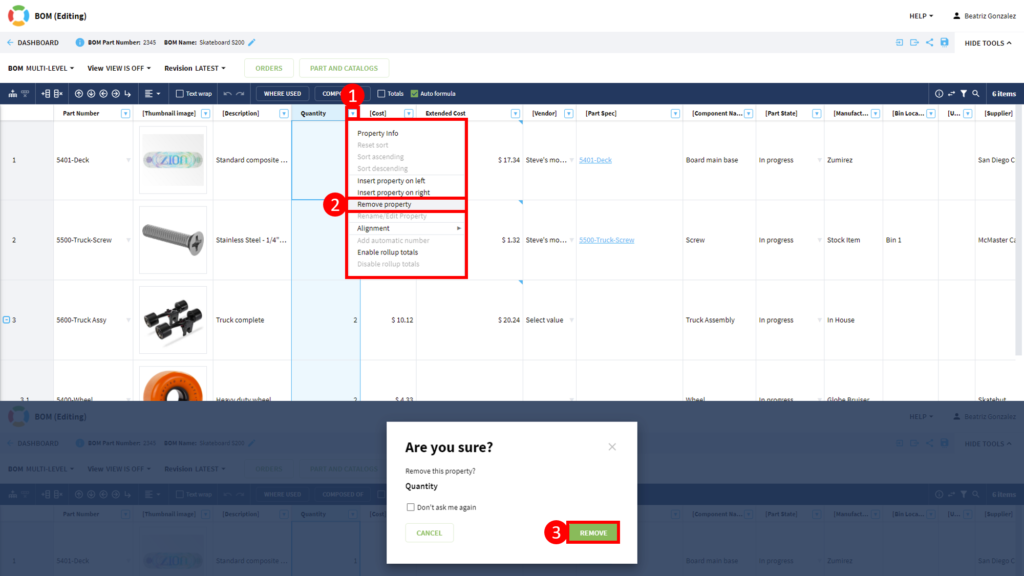
In the BOM or catalog view, click on the arrow next to the property column you want to delete. Choose “Remove property” from the drop-down menu. Then click on “Remove” in the pop-up window.
This will remove the selected property. Repeat this as needed for all the properties you want to delete.
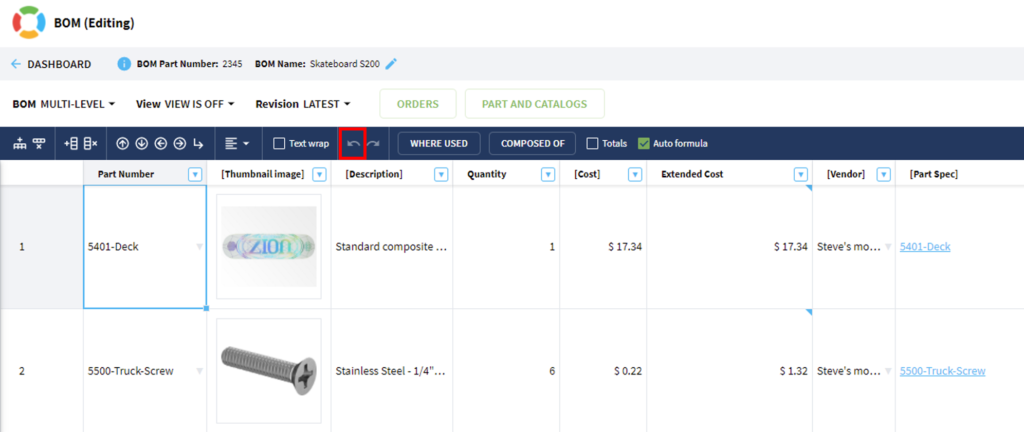
If you want to undo what you just deleted, you can click on the left “Undo” arrow in the toolbar.
NOTE: The Undo button only recovers the last operation you did.
Deleting and Recovering BOMs or Catalogs
To delete a BOM, from the Dashboard, select the BOM you wish to delete and click on the trash can icon.
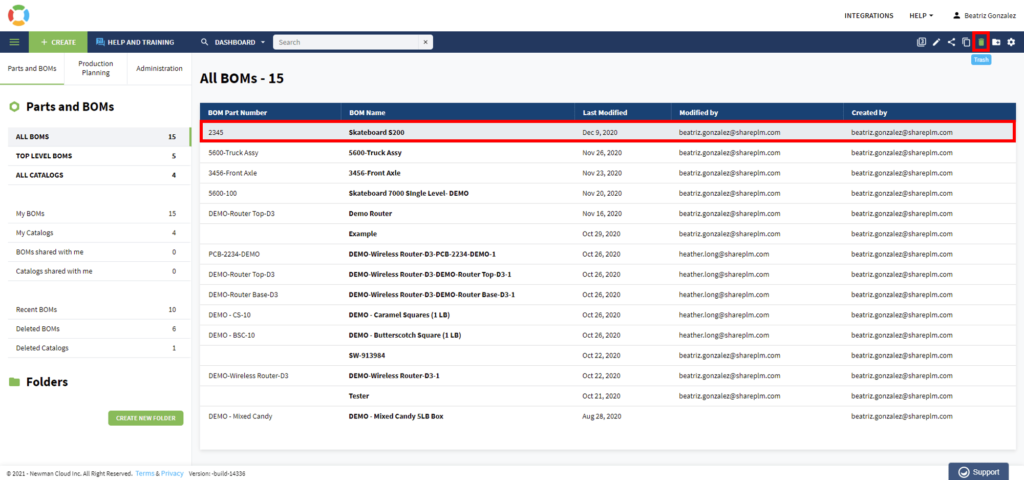
You can select multiple BOMs or catalogs to delete by using the Shift key or Ctrl key.
NOTE: When you delete a BOM, the BOM will be deleted, but the information used in the BOM stays saved in the system.
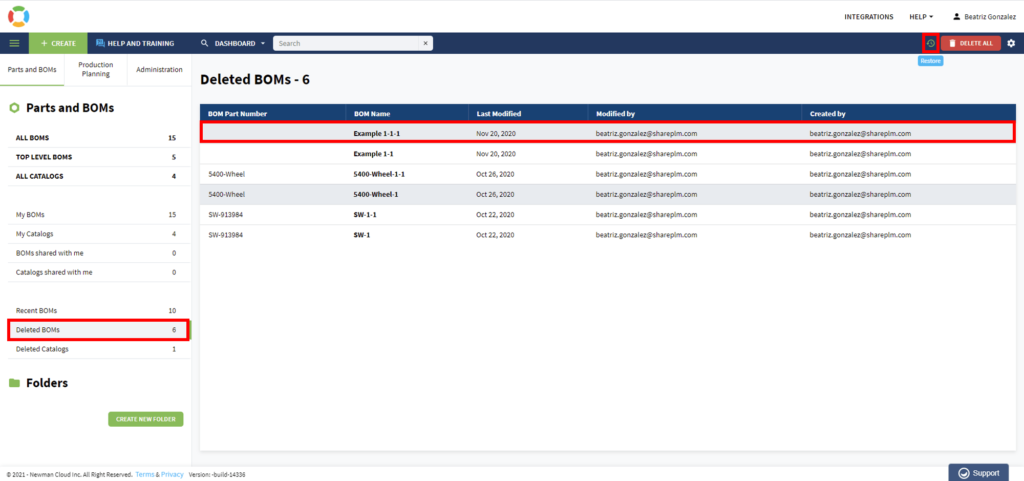
To recover deleted BOMs or catalogs, navigate to the bottom of the navigation pane on the left and choose “Deleted BOMs” or “Deleted Catalogs”. There you will just select the ones you want to recover and then click on the restore icon at the top.
Conclusion
OpenBOM gives you full flexibility in data management. There are many ways to create your BOMs and catalogs in a fast and efficient way with our interface.
If you are looking for professional lifecycle management software, bill of material software, document, and product data learn more about the OpenBOM solutions. You can manage parts, vendors, and purchases quickly and easily now!
Watch this short video to see more of the user interface feature updates so you can better work with and edit your BOMs.

